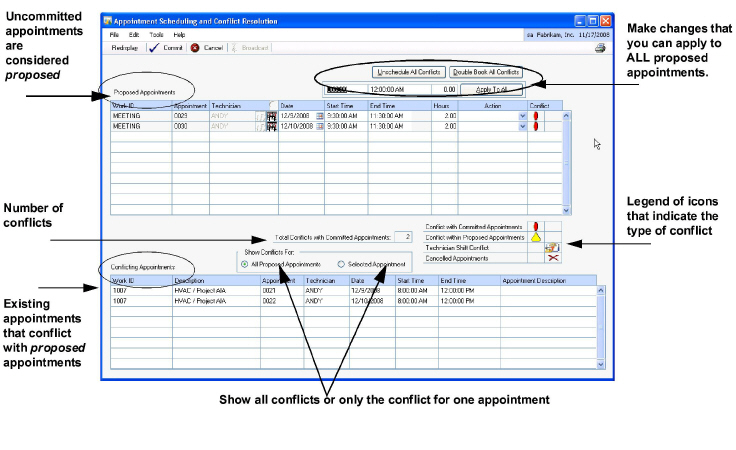
When you create appointments that result in a conflict with existing appointments, the system provides the opportunity to resolve those conflicts immediately. You can view the proposed appointments side-by-side with existing appointments, and resolve those conflicts by changing times, and dates, or even by changing appointments to unscheduled.
You can resolve appointments that were created from any of the following areas:
-
Appointments window, accessed from the Service Call window, Job Maintenance window, Dispatch Board, or Technician Board - Appointments windows
-
Appointments Wizard, accessed from the Technician Activity Entry Wizard menu option
-
Visit Wizard on the Maintenance Contract window
-
Create MCC Calls routine
Individual vs. Multiple Appointments
|
If you are creating |
Then |
|---|---|
|
A single appointment |
After saving the appointment, if there are conflicts, you will receive a message indicating there are appointment conflicts. Select one of the following buttons on the message window:
|
|
Multiple appointments |
The Appointment Scheduling and Conflict Resolution window opens immediately after saving the appointments, regardless of if there are conflicting appointments. |
Appointment Scheduling and Conflict Resolution Window
The Appointment Scheduling and Conflict Resolution window displays when a conflict results from creating appointments. In addition, for multiple appointments created at once (as a group), the Appointments Scheduling and Conflict Resolution window will appear even if there are no conflicts. This allows you to preview those appointments before saving them.

As shown in the sample window above, the technician had been scheduled to work on a job (conflicted appointments), but somebody booked meetings (proposed appointments) for that technician that conflicted with the job.
-
You can resolve an appointment conflict in one of several ways. When you make a change, tab off the field.Change appointment timesUse the Start Time and/or End Time fields. You can also use the Next Available Time button to select an optimum time. In addition, you can change all proposed appointments at once using the start and end time fields that appear just above the Proposed Appointments area. Change times, as needed, then select Apply All.Cancel appointmentsUse the Cancel Appointment option in the Action drop-down list.Unschedule appointmentsUse either the Unschedule option in the Action drop-down list (for individual appointments) and tab off the field, or the Unschedule All Conflicts button (for all appointments). Unscheduling appointments changes the starting and ending times to midnight (12:00 AM).Double-book appointmentsUse either the Double Book option in the Action drop-down list (for individual appointments) or the Double Book All Conflicts button (for all appointments). The system must be set up to allow for double-booking.Change conflicting appointmentsInstead of changing the proposed appointments, you can select to change the existing conflicted appointment to resolve any conflicts. To do so, select the conflicted appointment, then zoom on the Work ID column heading to open the Appointments window. Make changes, save, and close the Appointments window. After making changes, select Redisplay to see if the appointment conflict was resolved. You will know it has been resolved when the conflicting appointment disappears from the Conflicting Appointments scrolling window.
-
When finished resolving appointments, select Commit to save the appointment(s). The label Proposed Appointments changes to Edit Appointments.
More About Resolving Appointments
-
When making changes to resolve a conflict, always select Redisplay before Commit. That way, you can be sure that when you do commit (save), the appointments will be saved.
-
You cannot commit (save) appointments in this window until ALL conflicts are resolved.
-
If you have changed times for proposed appointments, and decide to revert to the initial proposed times, select the Reset Proposed option in the Action drop-down list. Selecting this option reverts the appointment times (and other information) back to the values that existed when you first created the appointments.
-
When creating a single appointment, if the only conflict that results is a shift conflict, you will not get the Appointment Scheduling and Conflict Resolution window; instead, you will receive the prompt informing you of the shift conflict and still can cancel or continue (save).
-
To print a list of appointments that includes the conflicting appointments, select the printer button on the upper right part of the window.
After appointments are saved, the Appointments window looks slightly different, depending on whether the appointment was created individually, or as part of a group of appointments. If the appointment was created as part of a group, a button with the letter G appears to the right of the notes button. Appointments are automatically synchronized with MobileTech devices.
To view all appointments that were created along with the current appointment, select the G button. This opens the Appointment Scheduling and Conflict Resolution window to view/manage only those appointments that were created together.
