
See PDF Downloads for a downloadable version.
Release Version: 2025.0.50Release Date: September 2025
Installing MobileTech
Upgrading to MobileTech 2025 From a Previous Version
You can upgrade to MobileTech 2025 from version 10 (2024) or higher.
-
Before you upgrade from a previous version of MobileTech:
-
Make sure that all mobile devices have been synchronized to the host system. If you've made changes to views or stored procedures in previous versions of MobileTech, those changes will be overwritten during the upgrade.
-
IMPORTANT: Inactivate any active Woodford projects before running the upgrade.
-
-
You'll be prompted to install database objects the first time you log into MobileTech Administration after upgrading. You must do this for each company. If you're not prompted to install database objects, go to Tools > Create MobileTech Objects and select Process. For more information, see Log into MobileTech Administration in the Installation & Administration Guide. For additional upgrade notes, see Upgrade MobileTech Server in the Installation & Administrative Guide. Installing database objects during an upgrade does not remove any data from the middle tier.
Installing MobileTech for the First Time
You can install and set up MobileTech as described in the Signature MobileTech Installation & Administration Guide.
You can install MobileTech Server on any Microsoft Windows Server environment. For specific versions, see the Signature System Requirements. MobileTech Server cannot be loaded in a non-Windows Server environment.
Installation Components and Compatibility
MobileTech Components to Install
To set up and implement MobileTech, you must install these components:
-
MobileTech Server 2025.0.50 includes Resco Woodford v18.1.1, Publish Version 16.0
-
MobileTech 2025.0.50.Woodford (included in installation)
-
MobileTech with Inspections 2025.0.50.Woodford (if you are using Inspections)
IMPORTANT: Due to issues with Resco licensing where the Inspection license is assigned to any technician who syncs with a project that has Inspections even if they are not assigned the Inspector Role, you need to have two Woodford projects (one for Inspections, one for non-Inspections). See Import the MobileTech Woodford Project for the updated steps for creating a child project and importing the Inspections project. -
Resco Mobile CRM 18.1.9.9 or higher (from device App Store)
Note: The two most recent major versions of MobileTech are validated for use with the latest release of Resco MobileCRM. While older versions of MobileTech may function with Resco MobileCRM, compatibility is not guaranteed, and use of unsupported versions is at the user’s own risk.
Important Notes
-
Microsoft announced on May 24, 2024, that they are deprecating Bing Maps. Customers using Bing Maps for Enterprise Basic or Free license will no longer be able to use Bing Maps for Enterprise services beyond June 30, 2025. To continue using Mapping in MobileTech, you will need to obtain a Google Maps API key at https://cloud.google.com/maps-platform/pricing/. (You will need an API key that includes Maps and Routes. You do not need Places.) See Enter the Google Maps API Key.
-
As App Stores increase their security requirements, HTTPS (with Trusted SSL Certificates) will soon become required across all device types. Therefore, we recommend you transition your MobileTech environment to use SSL with a trusted certificate.
-
Do not install MobileTech server components on your SQL Server machine.
-
Install MobileTech Administration on the MobileTech web server.
-
If your technicians need WiFi, and your company typically turns it off overnight and on weekends, you might want to reconsider this practice to ensure they have the necessary access.
Compatibility
To find a complete list of system requirements across all the Signature modules, refer to the System Requirements documentation.
This table lists the tested and supported compatible versions of MobileTech 2025.
|
Software or device |
Compatible versions |
|---|---|
|
Operating Systems |
|
|
Signature Version IMPORTANT
If you are upgrading to Signature 2025, you must upgrade to MobileTech 2025. However, if you are only upgrading your current MobileTech to MobileTech 2025, you can be on any of these compatible Signature versions.
|
|
Incompatibility
-
The MSI (non-Windows Store) version of the Resco Mobile CRM available from the Resco website is no longer compatible with MobileTech. If you currently use the MSI version, you must migrate to the Windows Store version and should plan accordingly before upgrading.
-
Flexible Forms are not compatible with Microsoft Windows 11.
-
Servers running Cylance script control.
-
MobileTech inventory transactions do not support Microsoft Dynamics GP Inventory Lots.
Obtain a Google Maps API Key
To use the Mapping feature on any device, you will need to obtain a Google Maps API key at https://cloud.google.com/maps-platform/pricing/. You will need the Maps JavaScript API (Maps > Dynamic Maps) and Geocoding (Places tab). Geocoding is required for setting coordinates. See Enter the Google Maps API Key.
Microsoft announced on May 24, 2024, that they are deprecating Bing Maps. Customers using Bing Maps for Enterprise Basic or Free license will no longer be able to use Bing Maps for Enterprise services beyond June 30, 2025.
Installation Notes
-
IMPORTANT: If you have any modified or customized MobileTech or Signature Agent database triggers, back them up before upgrading to Signature 2025, and reinstall them after the upgrade.
-
After installing MobileTech 2025, if you have set up password complexity, you will need to set this up again as the MobileTechAdmin.exe.Config file is overwritten.
-
You will need to add the IIS APPPOOL\RescoCloud user to the SQL Server Reporting Services Home Folder permissions page. For instructions on adding the user, see https://docs.microsoft.com/en-us/sql/reporting-services/install-windows/reporting-services-configuration-manager-native-mode?view=sqlallproducts-allversions. You can filter the instructions to your SQL Server version.
-
The Job Summary Timesheet report no longer prints automatically when a technician completes a job appointment with billable transactions on the appointment. If your company would like to continue to have this report automatically generated, you can remove the comment lines from Offline HTML:
Enabling the automatic timesheet generation after completing a job appointment:
-
In Woodford, select the MobileTech Woodford project and then select Edit from the menu bar.
-
From the left navigation, select Offline HTML.
-
Double-click Entity to open.
Double-click Appointment to open. -
Select appointment-form_complete-job.html and then select Edit from the menu bar.
-
Scroll down to FORM EXECUTIONS.
-
Locate //,generateTimesheetReport(appointment) //Uncomment line to turn on automatic generation of timesheets.
-
Remove the preceding //, and succeeding //Uncomment line to turn on automatic generation of timesheets so that the line only displays the following.
generateTimesheetReport(appointment) -
Select Save.
-
Select Save from the menu bar.
-
Publish the project.
-
IMPORTANT
Deprecation Note:
The legacy UseXOi feature has been deprecated and is no longer available as a setup option in MobileTech Administration.
Bug Fixes
|
Case # |
Fixed Issue |
|---|---|
|
MT-1888 |
We’ve increased the length of the Sublocation ID field (gpsublocationid) to 51 characters to match the Signature Equipment Sublocation character limit. |
|
MT-2012 |
Ampersand symbols (&) added in a note are no longer removed when the note is saved. |
|
MT-2061 |
The SSRS report connection will no longer fail when the password has the company name in it. |
|
MT-2134 |
When updating the MobileTech database, the correct role privileges are now populated as expected. |
|
MT-2223 |
On the Task Details form, task responses for list types now display after a completion date has been entered. |
|
MT-2226 |
We’ve increased all task code (gptaskcode) columns to 11 characters in the following tables:
|
|
MT-2234 |
On the Time Entries form, the Equipment lookup now correctly displays the equipment records for the location. |
|
MT-2240 |
Updated the logic in the wsMethods.js file to log any errors with the listSelectedView.txt file. Some customers were receiving the following errors in one pop-up message: “Read List View File Error: listSelectedView.txt, Callback error: JSON, Parse error: Unexpected EOF”. |
|
MT-2242 |
Users will no longer experience deadlocks on service call attachment syncs. We’ve added NOLOCK to the WSMobileSelectServiceCallAttachment stored procedure. |
|
MT-2243 |
We’ve added JOIN logic to exclude any TimeLog records without a valid parent appointment. Some users were experiencing an issue where, even though they were set up to allow for time overlaps, they weren’t able to do so. |
|
MT-2304 |
Equipment meter readings in MobileTech are now updating Equipment Management records as expected. Part of the fix was to move the sync order of the task and task responses. We’ve also updated the wsMobileTechTaskResponse stored procedure to perform an INSERT if the UPDATE returned 0 records. |
New Features
General
|
Case # |
New Feature |
|---|---|
|
MT-1961 |
We’ve replaced the need for the eTimeTrack Web Service to be installed and are now using stored procedures. |
|
MT-1987 |
You can now create a change order at the job level without a job appointment. For more information, see Enter and Edit Change Orders for Jobs. From the Job list:
|
|
MT-2047 |
All notes related to a job are now visible from the Notes tab. See Notes. This includes the following related entities' notes:
Job Notes Screenshot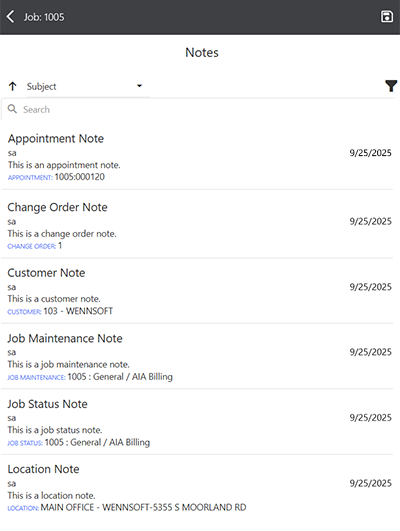
|
|
MT-2048 |
All notes related to a service call (and service appointment) are now visible from the Notes tab. See Notes. This includes the following related entities' notes:
Service Call Notes Screenshot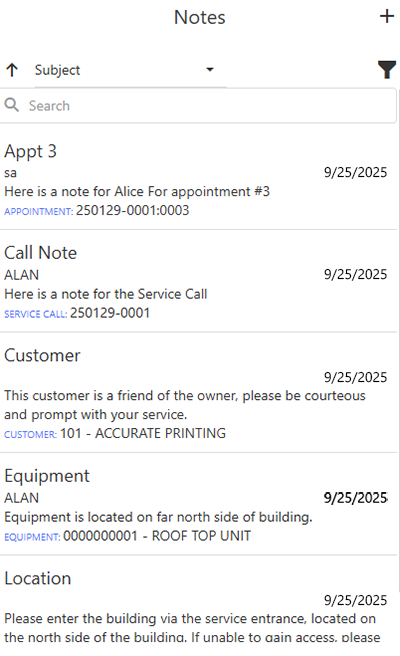
|
|
MT-2062 |
If you or another administrator forgets the MobileTech Integration User account password, you cannot retrieve the existing password, but you can change it. While the option is displayed to all users under Tools, only a SQL sysadmin can access this window. The password must meet the password policy requirements set up in Resco Cloud and for SQL users. For more information, please see Manage MobileTech Integration User. Please make sure to write down the new password. The connection strings are now encrypted in the configuration files, so the password cannot be viewed. MT-1845 |
|
MT-2179 |
The sync process has been optimized to reduce device synchronization time. |
|
MT-2241 |
We’ve updated the Load Data window to display additional error information. You will now see which technician batch has the error, the stored procedure (if applicable), and the error message. This information will only display on the parent sync. If any child syncs have errors, you will see “One or more errors occurred”.
ScreenshotsMultiple Child Sync Issues 
Prior Sync Issues 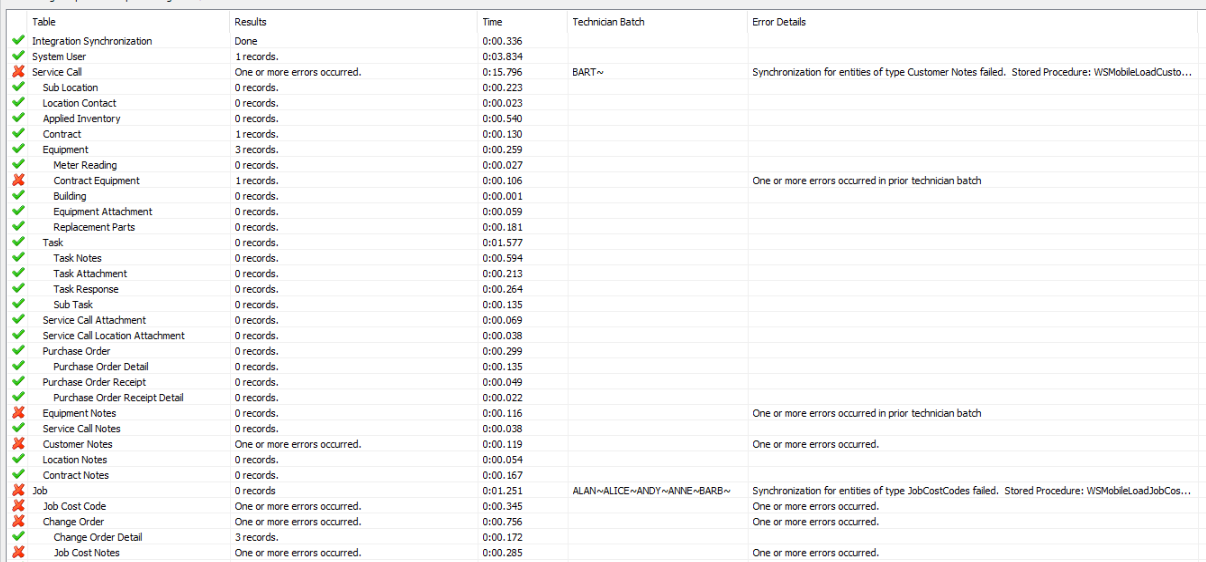
|
|
MT-2251 |
We’ve added the Job User Defined 1 and User Defined 2 fields (JC00107 table) to the MobileTech Woodford project. You can add these read-only fields to display if needed on jobs in MobileTech. |
|
MT-2258 |
The Consumed Inventory form now uses the same decimal places for the Quantity field that Signature does. This only applies to inventory items, with no changes to non-inventory items. You will need to refresh the Site Inventory lookup to view this change. In MobileTech Admin, select Tools > Refresh Lookups. Site Inventory is found under Employee > Technician Site. KNOWN RESCO DISPLAY ISSUE: On the Consumed Inventory and PO Line Item Forms, the quantity will always display with 2 decimal places (based on the entity’s metadata), but it will only let the user enter the correct number of decimal places. |
|
MT-2270 |
In MobileTech Admin, when adding or updating a technician, the technician’s email is automatically added in Schedule.
|
|
MT-2277 |
The existing IncludeAllCallNotesWithHistory setup option found in Company Specific Settings has been updated to default to True. Note that we are not changing the value for customers if you have already set the value. This option determines if all service call notes will be included when historical records are requested. The default value is True. The notes display on the History tab in the Other Notes section. For more information, see MobileTech Company-Specific Settings. |
|
MT-2278 |
We’ve added a cleanup step for job cost codes to clean up orphaned records. You will need to recreate the cleanup job to add this step. See Create a Cleanup Job for the Middle-Tier Database. |
|
MT-2298 |
The following new feature won’t be available until you upgrade to Signature 2025: Refrigerant tracking has been updated to comply with the American Innovation and Manufacturing (AIM) Act’s 2026 reporting requirements. The AIM Act brings major changes to refrigerant management. Businesses must meet new regulatory requirements for tracking, reporting, and leak detection by January 1, 2026. For more information, see Background on HFCs and the AIM Act | US EPA. We’ve added four new refrigerant equipment types:
We’ve removed the 6 - Mid-Size Appliance 5 to 50 pounds refrigerant tracking type from the drop-down selection as it is no longer exempt in 2026. Equipment records that are currently using this option are allowed to still use it. We’ve added an ALD Installed toggle on the equipment record that technicians can select to indicate that automatic leak detection has been installed on the equipment. |
Resco Releases and Inspections
|
Case # |
Description |
|---|---|
|
MT-2147 |
Additional new features from Resco's Winter 2025 Release:
|
|
MT-2265 |
Additional new features from Resco's Spring 2025 Release:
|
Important: Whitelist new Resco web services
Resco changing the infrastructure of their web services, most notably license checks. If you are using their solution in a protected enterprise environment and you previously whitelisted access to iservices.resco.net (or its IP address representation), you probably need to whitelist additional hosts/IP addresses.
They strongly suggest to allow additional hosts: svc.resco.net, svc-01.resco.net, svc-02.resco.net. See also the detailed information below.
This change can affect the following services:
-
Resco Mobile CRM license checks
-
Location tracking
-
Woodford license checks
-
Power Solutions license checks (Forms+, Steps+, Docs+)
-
Push notifications
Inbound communication
|
Old host |
New host |
IP address |
|---|---|---|
|
52.178.108.57, 52.174.189.28, 52.174.197.249, 52.174.184.182, 51.144.110.240, 40.91.197.7, 51.105.222.217, 51.105.223.23, 51.105.223.245, 51.124.144.104, 51.124.144.135, 51.124.144.234, 51.124.145.103, 51.124.146.134, 51.124.146.152, 51.124.146.186, 51.124.146.199, 51.124.147.1, 52.174.184.18 |
||
|
13.67.218.66, 23.101.119.168, 13.67.143.202, 104.43.212.51, 52.173.22.3, 168.61.210.239, 13.89.41.125, 20.221.38.166, 20.221.38.194, 20.221.38.247, 20.221.39.35, 20.221.39.146, 20.15.152.120, 20.15.152.213, 20.15.155.30, 20.15.155.64, 20.15.158.8, 20.15.158.67, 20.221.32.136, 13.89.172.6 |
Outbound communication
Blocking of outbound communication on the client side is relatively rare. Before this change, clients connected to physical servers; it was enough to add their inbound IP addresses:
|
Old host |
New host |
IP address |
|---|---|---|
|
52.174.184.18 |
||
|
13.89.172.6 |
||
|
- |
see below |
After the change, Resco Mobile CRM will no longer connect to the servers directly but instead go via a Front Door, svc.resco.net. If this fails, the app will try to connect directly to the servers, i.e., their IP addresses should remain allowed. It is necessary, however, to add the IP address of the Front Door. The Front Door infrastructure is managed by Microsoft. You can find the IP addresses using the Service Tag "AzureFrontDoor.Frontend". If you need assistance, contact Resco support.
Resco’s New Login Experience
Legacy Login Mode
When logging into the Resco’s new login experience (October 6, 2025 app update) users see a new login window. To continue using the regular login, select Legacy login mode at the bottom of the Login Setup window.
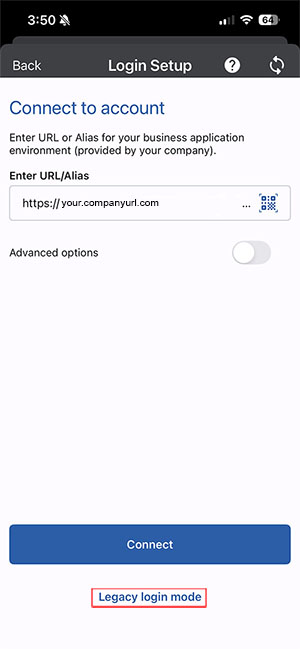
With this new login experience, if you have EventBasedSync = True, the app will just auto-sync. Users are no longer prompted with the login window.
Changing the CRM User Email Address
If you are logging into a device and need to change the CRM user login email address, you can do this by tapping the current email address.
-
In MobileTech, select Setup > Resco Setup.
-
Select the current user email address hyperlink.
-
Replace the email address in the User Name field with your email address.
-
Enter your Password.
-
Select the Sync icon.
Biometric Login
Unlock your Resco Mobile CRM using biometrics (if your device and company policy support the feature).
-
In MobileTech CRM, go to Setup.
-
Toggle User Fingerprint to On.
-
The next time you log in, you are prompted if you want to allow MobileCRM to use your fingerprint or Face ID to login. The option for fingerprint or Face ID is dependent on your device.
-
Select Don’t Allow or Allow.
