Service Pack 1
Release Version: 9.0.80
Release Date:March 2023
|
Case # |
Description |
|---|---|
|
MTW-2460 |
If you would prefer the inspection report to be sent in the next sync after creation (instead of when the appointment is completed) then you can continue to do so by setting up Resco Cloud's organization email. See Set Up Organization Email in Resco Cloud (optional). You will also need to create a Resco process for each Inspection template that you want to send an automatic email. For more information about creating a process, see Resco's Wiki: https://docs.resco.net/wiki/Process. Please contact WennSoft Support for help with setting up the process(es). |
General Release
Release Version: 9.0
Release Date:November 2022
|
Case # |
New Feature |
|---|---|
|
MTW-1493 |
Technicians can now view open service calls in the Call History list by selecting the new Include Open Calls checkbox. Before this new feature, only completed or closed service calls displayed. |
|
MTW-1534 |
Users can now view the Fault Details for equipment before creating the service call or service request. The Fault Details view includes the fault name, priority and fault status icons. Faults are sorted to display "In fault" rules at the top of the list and then sorted by Priority. Users can narrow the displayed list by searching for any displayed information (like status, etc.). Select the fault to display the timestamp, description, issue type(s), status, system effect, and recommendations. From the specific fault display, users can create a service call or service request for that fault, or they can close the view to proceed without creating a call/request. See Create a Service Call or Request from BOB Dashboard or Tab. |
|
MTW-1550 |
Service Area has been added to the MobileTech Schema for custom needs. The read-only servicearea field (limited to 15 characters) is now available on the Location table. |
|
MTW-1640 |
We've added a new Appointment Details section to the New Service Call form where technicians can add the appointment start date, estimated hours, description, and status.
The service call and appointment display as "Pending Service Call" and "Pending Appointment" until the technician has synced the device. If the pending service call is deleted, this also will delete the pending appointment and appointment status change timestamp. If you don't want the Appointment Detail fields to display on the New Service Call form, you can update the SetAppointmentDetailsOnNewCall option to false in SQL. |
|
MTW-1691 |
We've added refrigerant tracking to the appointment validation that applies only if:
When completing the appointment, Add Refrigerant Tracking now displays in the Missing Recommended Data window. 
This validation checks if the current user has not entered a refrigerant tracking record for at least 1 of the assigned equipment on the service call. Users can still select to complete the appointment without entering the refrigerant information.
|
|
MTW-1715 |
In MobileTech Admin, we've added a Send Test Email button in the Setup Options window so that you can test your SMTP server settings in the Report Settings section. If successful, a "Test Email sent to Admin Email Address" message displays. If unsuccessful, an error message displays the system error(s). See Report Settings. The email layout is as follows:
|
|
MTW-1718,
|
Event-based syncing now includes creating equipment and adding purchase order lines (see the note below for purchase orders). After saving the equipment or purchase order, technicians are prompted to sync their device if they have UseEventBasedSync turned on. See Mobile Device Global Settings . To use event-based syncing after adding a PO line, you will also need to update Offline HTML to set the "usePOEventBasedSync" = true. The default for this variable is set to false. This variable is found in file entity\purchaseorderdetail\purchaseorderdetail-form.html in the MobileTech Woodford project. |
|
MTW-1807 |
If you do not want your technicians to be able to create appointments in MobileTech, you can remove the Create permission from the Appointment entity in the MobileTech Woodford project. See Turn Off Appointment Creation (optional). |
|
MTW-1812 |
The departmentid and positionid read-only columns in the middle-tier Employee table are now populated during a Load Data or integration sync. |
|
MTW-1825 |
Technicians can now view read-only historical task responses on an MCC (maintenance contract computer-generated) service call from the Task form by selecting the new Task Response History tab and then selecting the Redisplay icon within the expanded section to retrieve the task response history. Internet connectivity is required. This displays the task label and response for historical service calls on the contract. The number of historical service calls displayed is determined by the MobileTech Company-Specific Settings setup option HistoryCount . The technician can collapse/expand the entire list or individual service calls. The historical responses remain on the device until the next device sync. See Complete Tasks for a Service Call. This option requires internet access. |
|
MTW-1826 |
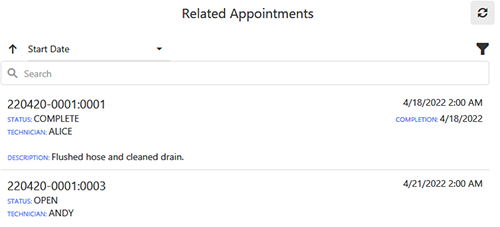
We've added the ability for technicians to see other technicians scheduled for the same service call or job by selecting the new Related tab on the Appointment form and then selecting the Redisplay icon. Technicians can see the appointment status, technician name, appointment date/time, appointment description, and completion date. The list of appointments can be sorted by start date or appointment and/or the list can be filtered. This option requires internet access.
|
|
MTW-1827 |
We've added a UseReplacementParts option in Equipment Settings to utilize replacement parts that are added to equipment in Signature. When set to True, the Parts tab is added to the Appointment Completion form for service appointments. When selected, replacement parts are listed and grouped by equipment assigned to the service call. The technician can select and add the replacement part as an inventory transaction. The information displayed on the Replacement Parts form includes the item number, description, quantity needed for replacement, and unit of measure. The quantity refers to the quantity added for the replacement part in Signature. For information on using the Replacement Parts tab, see Create a Replacement Parts Inventory Transaction. Replacement parts for equipment are added in the Replacement Parts window in Signature. See Assigning Replacement Parts to Equipment. If UseReplacementParts is true, then UseTaskMaterials in the Task Settings section must be false. |
|
MTW-1828,
|
We have added the ability to track the time and mileage taken to travel to or from an appointment. Travel can be started, paused, ended, or deleted. This option is available if UseLabor, UseTimeLog, and UseTravelTimeLog are all set to True in MobileTech Admin. See Labor Settings and Time Log Settings. To view more information on how to use the new feature, see Time In and Out of Travel. Depending on setup:
|
|
MTW-1829 |
We've added the six equipment user-defined fields to the bottom of the Equipment form. This includes the user-defined 1-5 (char(31)) and user-defined 9 (datetime) fields. For information about setting up the user-defined labels, see Labeling User-Defined Fields in the Service Management User Guide. 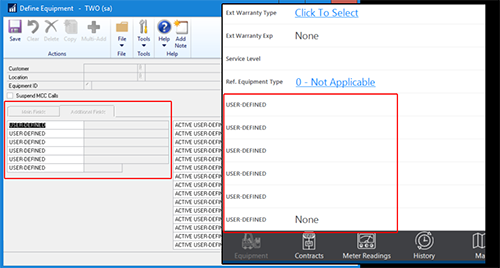
|
|
MTW-1831 |
Technicians can now add attachments to any labor expense transaction from the new Attachments tab on the Time Entry form. The transaction does not have to be saved before the attachment is added. The attachment name includes the transaction number. If the transaction is not fully saved or deleted before being synced, the attachment is also deleted. Once the device has been synced, the attachment is available in the Signature Time Card Entry window and attached to the transaction number. When adding work crew transactions, if an attachment is added at the initial creation of the time entry, the attachment is only added to that transaction. After the work crew time entries have been created, an attachment (same or different) can be added to each transaction. See Adding Attachments to Time Entry. |
|
MTW-1832 |
Technicians can now update their own passwords via devices. Password reset policies can be enforced on a timed basis (30, 90, 180 days, or 1 year). You have the option to require technicians to create their own password in MobileTech after they've entered the temporary password that you've assigned. You can assign a different password to each technician or you can assign the same password to multiple technicians. See Set Technician Passwords with Admin Console (optional). If you want to set up a Password Complexity and Lockout Plan, see Setup Password Complexity and Lockout Policy. |
|
MTW-1833 |
We've added a contract indicator that displays to the left of equipment that indicates the equipment is on a contract. This icon displays on the Location Equipment tab, Service Call Equipment tab, New Service Call form, and the BOB Equipment dashboard. 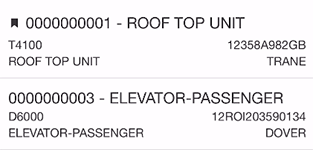
|
|
MTW-1835 |
MCC (maintenance contract computer-generated) service call task notes are now available in the Task form as read-only. The technician can select the Task Note tab to expand the form to view the note. See Complete Tasks for a Service Call. |
|
MTW-1841,
|
You can now add a custom statement that displays above the signature box on the Timesheet Signature form and is displayed on the Time Sheet Report. The character limit is 4000 characters. Keep in mind that longer statements will require technicians to scroll through the statement on their devices. The optional custom text is entered in Signature Settings. To use this feature, you will need to deploy the updated Timesheet report. For information on deploying reports, see the Signature Reports Guide. 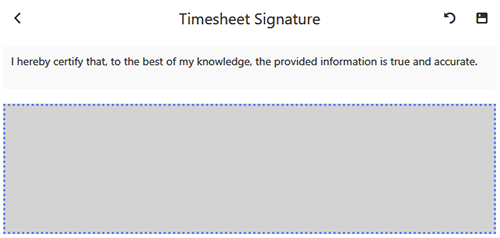
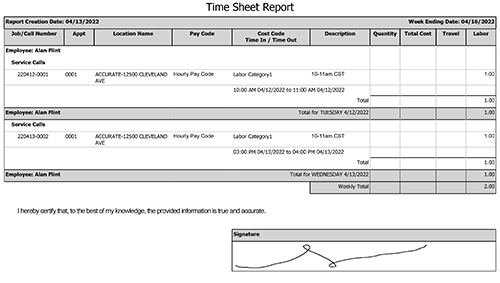
|
|
MTW-1844 |
Users can now add attachments to service and job appointments. The attachments are available in Signature 18.05b07 or higher at the appointment level. See Add Attachments to a Service Call. |
|
MTW-1856 |
On the Equipment form, users can now select a different Building ID and can enter a Building Room. |
|
MTW-1871 |
Auditing and Log synchronization events are now enabled by default in the MobileTech Woodford project. These options are both needed to populate the Sync Dashboard. See Using Sync Dashboard (optional). |
|
MTW-1871 |
The sync prompt now defaults to enabled with the sync interval set to 4 hours and the check interval is 15 minutes. The prompt automatically displays on the device if the user hasn't synchronized their device within 4 hours with a check interval set at 15 minutes. After the technician syncs, the sync interval is reset. See Edit Synchronization Prompt (optional). |
|
MTW-1871 |
The Support Email field in the Branding section of the MobileTech Woodford project now defaults to blank. When technicians select Email Log Files in the MobileTech About window, this is the email address that defaults to the device's email client. If the Support Email field is left blank, the technician will need to enter the recipient email. For more information, see Add Support Email Address (optional). |
|
MTW-1875 |
For Signature 18.04b06 or higher, when the customer record is marked as inactive in Signature, users can no longer create a new service call for any of the customer's locations. If the customer is inactive, none of their locations will display on the New Call form. If you are using the Building Optimization Broker integration, when you select equipment for an inactive customer, Create Service Call and Create Service Request are removed from the list of action items. New appointments can still be created from existing service calls. See Enable Service Call Creation for Inactive Customers and Inactive Locations. |
|
MTW-1877,
|
Technicians now can delete a time-in for a job appointment or technician activity. Technicians are asked if they want to manually update the appointment or activity status. Technicians have the option to manually update the status. This is only available if the technician has not synced their device. See Delete Time-In. This feature can be turned off in Offline HTML in Woodford. See Turn Off Ability to Delete Time-In (optional). |
|
MTW-1881 |
When saving responses for Yes/No, Integer, or Numeric task responses, the taskresponse.dateresponse value is set to the current date to indicate that a response of None or 0 (zero) is a valid response. Previously, the responses that were set to None or 0 were read as a non-response. |
|
MTW-1913 |
When viewing service call history in MobileTech, if an employee is no longer an active MobileTech employee (and an active TimeTrack user), the Signature Employee/Vendor ID (gptechnicianid) now displays. Previously, if the technician was inactivated, the Employee information was blank. |
|
MTW-1923 |
We’ve added the ability to choose if you want the Job Appointment Summary Report and Inspection Reports to be stored at the Cost Code or Job Level. A new setup option JobAppointmentAttachmentLocation has been added to the Resolutions Settings Setup Options. You can select where you want to attach the Job Appointment Summary Report and Inspection Report in Signature. The default value is Job and attaches the reports at the job level. Select Code Code to attach the reports to the cost code assigned to the job. The default value is Cost Code. See Resolution Settings. |
|
MTW-1925 |
The JSBridge log file located on the device now includes when a technician selects Cancel in the Sync Reminder prompt. This includes the date and time the Cancel button was selected. See Edit Synchronization Prompt (optional). |
|
MTW-1969 |
Two new setup options have been added to Report Settings to provide the ability to turn off the summary reports when service and/or job appointments are completed. The default values are set to True.
|
|
MTW-2034 |
Latitude and longitude data is now captured when the TimeLog form is initially opened for Time In/Time Out and for Travel Time Log if the device has GPS capabilities and a value is returned. This information resides in the timelog table in the MobileTech Middle Tier. The fields are gptimein_latitude, gptimein_longitude, gptimeout_latitude, and gptimeout_longitude. GPS information cannot be edited on devices. If the travel time log is transferred, the original latitude/longitude values are used. Transferring the travel time log does not update the values. |
|
MTW-2049 |
We've updated how text input fields display on forms. Text input fields now contain descriptive text to help identify that these fields are editable and where to tap to add the text. Most text input fields display "Enter <field label>". On the legacy Job Safety Tasks form, the text fields display "Enter Response". 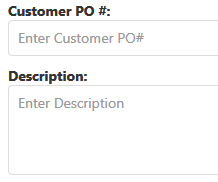
We've also updated the Date Time Minute drop-down to increment by 1 minute. Previously this was limited to a 5-minute increment. You can edit the minute increment value in the MobileTech Woodford file. See Edit Time Entry Minute Increment (optional). If you change the Time Log minute increment, this will change for all the date-time form inputs that have the ‘Normal’ style applied. 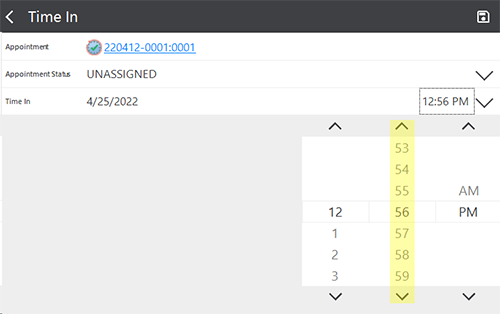
|
|
MTW-2050 |
When completing a service appointment, technicians can now add an attachment to the service call, appointment, or equipment associated with the service call. The attachment is available on the Attachments tab the attachment was added to (service call, appointment, or equipment). See Complete a Service Appointment. |
|
MTW-2051 |
We've added the Equipment tab to the Appointment Completion form. When selected, technicians can view equipment associated with the service call. Equipment can also be associated with the service call from the Equipment tab. Equipment can also be associated with the service call from the Service Call form. |
|
MTW-2058 |
We've added a Today's Appointments view to the Appointments list. Technicians can select Today's Appointments to view only the appointments for the current day. |
|
MTW-2074 |
From the Appointment Completion form, when a technician selects one of the following tabs that opens a list that currently has no items, the corresponding form opens automatically so the technician can add that item: Time Entry, Inventory, or PO Detail tab. Previously, after selecting the tab, the technician would have to click the Add icon to open the form to create the item. The form auto-open happens the first time you navigate to the corresponding tab within the same instance of the Appointment Completion form. For example, from the Appointment Completion form, you go to the Inventory tab. The Inventory form automatically opens where you can add the new inventory item. You close the Inventory form without creating a new item (the inventory list is still empty). You click a different tab. Still in the same instance of the Appointment Completion form, when you click the Inventory tab again, the empty Inventory list displays. You would have to select the Add icon to open the inventory form. The functionality has been added to the following lists but defaults to disabled (false). You can enable this in Offline HTML for each list by setting the variable autoOpenNewForm to true. Likewise, you can disable this for the Time Entry (from the Appointment Completion form), Inventory, and/or PO Detail lists by setting the variable to false. See Enable/Disable Automatic New Form for Empty Lists (optional).
|
|
MTW-2163 |
Technicians can now add or edit a comment on the Task form. The new Comment field has a 120-character limit and is found in the Task Details section below the Description field. The Comment field is available with or without task responses set up for the task. |
|
MTW-2187 |
We've added the ability to set up your password complexity requirements, password expiration, and lockout mode in MobileTech Admin. While you can manually add the technicians' passwords in MobileTech Admin (see Add a MobileTech User) or in Resco's Admin Console (see Set Technician Passwords with Admin Console (optional)), you can use the Update Password Policy window to set up the complexity, password expiration, as well as the lockout mode. In MobileTech Admin, select Tools > Update Password Policy.
We recommend enabling all requirements and setting the minimum password length to 8 characters. 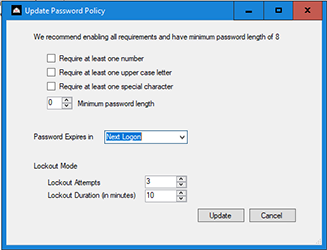
If you do not have a password complexity set up, the Update Password Policy window automatically displays after these events:
|
|
MTW-2194 |
Users will need to deploy the updated Job Summary report. For information on deploying reports, see the Signature Reports Guide. If you will not be enabling UsePurchaseOrderJob, you do not need to deploy the report.
|
|
MTW-2204 |
If you have updated to the latest Signature release (18.05b07), when you upgrade to MobileTech 9.0, the wsiMoblePurchaseOrderWork stored procedure will include a new @l_vTRX_Origin char(13) parameter that contains the value "MobileTech". This value corresponds with a new TRX Origin column in the Process Mobile Purchase Orders window in Signature. |
|
MTW-2208 |
We've added an audit table named WSMobileTechAdminAudit containing information about which machines have MobileTech Admin installed. The table includes the machine name, installation date, installation by, and installation version. |
|
MTW-2269 |
The AutoStatusUpdate setup option in Mobile Device Global Settings now applies to both job and service appointments. This setting determines the default status for appointments that are received by the device. The default value is blank, which means no status is assigned to the appointments. See Mobile Device Global Settings. |
|
MTW-2280 |
Technicians' latitude and longitude coordinates now automatically uploaded to the new audit_timelog table with a background sync to the middle-tier any time they time in, time out, or delete a time in. If you are using Travel Time Log, the coordinates automatically upload when travel time begins, pauses, resumes, ends, or if the travel time is deleted. See Travel Settings. Some of the fields in the audit_timelog table include the name of the event (Time In, Time Out, Delete Time In, Begin Travel, Pause Travel, Resume Travel, Delete Travel, and End Travel), the service call ID, job number, appointment ID, employee ID, time in, time out, and latitude/longitude. To capture the data, the device must be connected to the server and have GPS Location turned on. If there isn't a connection or errors occur, an error message is saved to the JSBridge log file. The audit_timelog table has been added to the clean-up job and only keeps entries that were modified in the last 21 days, which is the same functionality as the timelog. You can disable this feature by accessing Offline HTML in the Woodford file. Go to Entity > timelog and edit timelog-form.html. Set useTimelogBackgroundSync to false. Save and publish the project. See Disable Time In/Out and Travel Coordinates Background Sync. |
|
MTW-2281 |
When viewing the Job Detail for a job appointment, the Notes tab now includes all job notes including job, job cost code, change order, and job appointment notes. The Note tab is now always displayed, regardless of having a note attached. On the Note List, the note subject, creator, and date created as well as what the note references (note types (blue letters), appointment number, change order ID, job number, and job cost code) are displayed. Only the change order note can be edited. The job, job cost code, and job appointment notes are read-only. In the screenshot below, the user created the note subjects to indicate the note type. 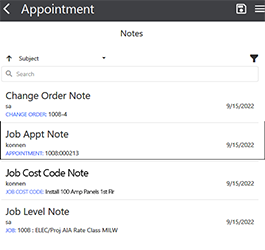
|
|
MTW-2288 |
We've added a new setup option to the Purchase Order Settings section called UsePONonInventoryItems. When set to True, this setting allows users to enter non-inventory items to purchase order lines. This defaults to True. See Purchase Order Settings. Originally UseNonInventoryItems in the Inventory Settings section allowed your technicians to enter non-inventory items when completing appointments and adding to purchase order lines. The Inventory Setting now only applies when completing an appointment. See Inventory Settings. |
|
MTW-2289 |
You can now add a shortcut to the Purchase Order Lines list on the home screen. When selected, the PO Lines list displays all purchase order lines on the device. The information included in the list is the purchase order number, vendor, item number, item description, site, quantity, unit, and date as well as the associated appointment ID, service call ID, or job number. Only the technician's appointment purchase orders display in the list. If the purchase order has not been synced to the back office, the technician can click on the PO line and then select Add PO Line to open the PO Line form to complete the new purchase order line. If the purchase order line has been synced, a message displays indicating that the purchase order cannot be modified. However, the technician can create a new purchase order line for the appointment by selecting the + icon to open the PO Line form and selecting the appointment. The PO Line form is completed as it was before. See Create a Purchase Order. For information on how to add the PO Lines icon on the home screen, see Adding Purchase Orders' PO Lines to Home Screen (optional). 
|
|
MTW-2293 |
We've added the ability to search for the customer number or customer name in the Field Invoicing Customer Setup window. See Set up Customer Options for Field Invoicing and Field Payments. |
|
MTW-2295 |
We've added the Enter Site Name toggle to the PO Line form if the technician has sites assigned but no inventory available for the site. The technician will need to enter the item number and description manually but can now have the option to select an assigned site instead of manually entering the site name. |
Resco Inspections
|
Case # |
Description |
|---|---|
|
MTW-1725,
|
Technicians can now view all inspection reports related to an entity including those created by other technicians within a selected date range if an internet connection is available. On the Inspection Reports list, we've added date range selectors and a Refresh icon. The date range defaults to the filter of the current week and the previous week. The technician can enter a date range and then select the Refresh icon to view all related inspection reports that have been created by any user, not just for the current user. The inspection report list has been updated to include the date the inspection report was created, the user who created the report if an online fetch was performed, and the appointment ID if accessing the reports from the Service Call form. This applies to the following forms:
|
|
MTW-1756 |
Users can now import a separate Woodford project that has Inspections enabled called MobileTech with Inspections 9-0-xx.woodford. This includes having branch/team entities enabled, Inspections is added to Home and Appointment forms. All Woodford projects are located in the C:\Program Files (x86)\Signature\MobileTech\Admin\Woodford folder. See Import the MobileTech Woodford Project.
|
|
MTW-1761 |
In the MobileTech Inspection Manager web app and Schedule, we now pull the technician's phone number from the K2A_ResourceExtension table, if available. The technician's phone number entered in Schedule (Administration > Resource Options) auto-populates in the Mobile Phone field in the MobileTech Inspection Manager web app (Technicians > select Technician). You will need to Load Data in MobileTech Admin (Tools > Load Data) to update the telephone number in the MobileTech Inspection Manager web app. If you update the technician's phone number in Resco Cloud, this will not update the phone number in Schedule. |
|
K2ADEV-742 |
The inspection report filename is limited to 51 characters (this includes any appended date or timestamp information and the MIME type ‘.pdf’) to match the settings in Signature. If the Inspection Report name exceeds 51 characters, the Inspection Report annotation entity fails with the sync error: String or binary data would be truncated. |
|
MTW-2190 |
You now have the option to link an inspection to all service appointments, all job appointments, and/or all equipment assigned to service appointments. This link is used to add an inspection to the appointment completion validation. Validation levels can be REQUIRED or WARNING. With REQUIRED, the inspection is required to complete the appointment. With WARNING, a technician can still complete the appointment without the inspection. Setting this up requires updating the link-appointment.js script in the MobileTech with Inspections Woodford project. You can limit the inspection to specific types of service appointments and/or equipment by adding the schema field name and value. See Inspection Validation During Appointment Validation Check (optional). 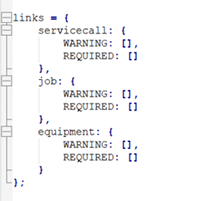
Inspections must be template dependent. To set up template dependency the inspection must use versioning and the dependency level must be set to full. For information on setting up, see Resco's wiki: https://docs.resco.net/wiki/Questionnaire_Designer#Creating_a_new_questionnaire. |
|
MTW-2191 |
From the Equipment form, when viewing the inspection reports for a piece of equipment, all inspection reports will now be available, including those created by other technicians. Previously only the inspection reports for the current and previous week were available. |
|
MTW-2195 |
Technicians can now select location contacts to send inspection reports to when completing the appointment. The Inspection Report Emails form is accessed just like the Summary report emails form, during the appointment completion process after selecting the checkmark. The inspection report is sent to the selected location contacts, the technician, and to the distribution list as set up in the Inspection Email Options window in MobileTech Admin. See Set Up Email Options for an Inspection Report (optional). On the Inspection Report Emails form in MobileTech, all inspection reports created for the appointment are listed. The technician can expand the inspection report to view a list of the location contacts and then select the contacts to send the inspection report. Only one report attachment is sent per email. For example, if the technician created two inspection reports and selects the same location contact for each report, the contact will receive separate emails for each inspection report. As with the automatic sending of the inspection report, in Report Settings, ReportEmailMode must be set to "Selected or entered by Technician" (see Report Settings) and in Inspection Email Options, the specific inspection report must be set up (see Set Up Email Options for an Inspection Report (optional)). IMPORTANT The functionality for when the inspection reports are sent has changed. Inspection reports will be sent when the appointment is completed. Previously, the inspection reports were sent when the device was synced. To disable the technician's ability to select location contacts for the inspection report, but still automatically send the report as set up in the Inspection Email Options window, you can set the Offline HTML variable 'sendInspectionEmailOnCompletion' to false in the entity > locationcontact > reportcontact-list.js. JSA (Job Safety Audit) Inspection reports do not display in the Questionnaire Report Emails form as there is already automated logic available. See Set up Report Email Options. |
|
MTW-2252 |
On the Job Safety Analysis Inspection form, the Technician name now auto-populates in the signature section. Technicians no longer have to manually enter their name. This feature requires you to re-import the Job Safety Analysis.qbuilder questionnaire file into the Questionnaire Designer. See Enable Job Safety Analysis (optional). |
|
MTW-2277 |
We've updated the JSA Inspection form to use the Resco Cloud Summer 2022 Release's leaner JSON data storage option. We've also updated the JSA Inspection form to use versioning as Resco has deprecated the non-versioned inspection templates. If you were previously using the JSA Inspection form, you will need to reimport the template to utilize the updates. |
|
MTW-1859 |
Additional new features from Resco Winter 2021 Release |
|
|
For information including a YouTube demonstration from Resco, please go to https://docs.resco.net/mediawiki/index.php?title=Releases/Winter_2021.
|
|
MTW-2120 |
Additional new features from Resco's Spring 2022 Release |
|
|
For information including a YouTube demonstration from Resco, please go to https://docs.resco.net/wiki/Releases/Spring_2022.
|
|
MTW-2274 |
Additional new features from Resco's Summer 2022 Release |
|
|
For information about the following new Resco Inspection features, see https://docs.resco.net/wiki/Releases/Summer_2022#Inspections. Inspections
|
|
MTW-2358 |
Additional new features from Resco's Autumn 2022 Release |
|
|
For information about the following new Resco Inspection features, see https://docs.resco.net/wiki/Releases/Autumn_2022. Inspections
|
