These settings are defined for each company that you have.
Depending on the Appointment Auto Reload setting under Global Options, you may need to choose the Refresh button at the top right of the Scheduling view to see your changes.
/*<![CDATA[*/ div.rbtoc1770847768690 {padding: 0px;} div.rbtoc1770847768690 ul {list-style: disc;margin-left: 0px;} div.rbtoc1770847768690 li {margin-left: 0px;padding-left: 0px;} /*]]>*/ Setting up schedule configuration Setting up schedule colors Setting up custom colors Setting up fields to display
Setting up schedule configuration
-
In Schedule, choose the hamburger menu icon and then choose Settings.
-
In Company Options under Schedule Configuration, complete the following fields, as needed:Schedule Days to Retrieve on Load (1-14): Enter the number of schedule days to display.Unscheduled Days Forward to Retrieve on Load (1-60) Enter the number of unscheduled days forward to display.Unscheduled Days Back to Retrieve (1-180) Enter the number of unscheduled days back to display.Time View Bar Height (pixels 20-200): Enter the height of the resources rows that display on the schedule board.Week ViewNumber of Days in Week View: Enter the number of days to display in the Week View.Skip Saturday/Sunday: Mark the checkbox next to the weekend days to not display on the schedule.Schedule Visible Hours: Enter the start and end time to display on the schedule.Automatic Status Assignment (Drag & Drop): Choose the status to automatically update after dragging from the Unscheduled grid to the schedule board for the following options. If the option is left blank, the status will not automatically update.Unassigned UpdateUnscheduled UpdateScheduled UpdateUnschedulable Status: This status applies to dragging to the schedule board as well as within the schedule board. Two examples:Unschedulable Status set to Waiting for Parts, this will prevent this appointment from being dragged to the schedule board. The status would have to be manually updated in appointment details and then dragged.Unschedulable Status set to Closed - This will prevent the closed appointment from being dragged to a different time slot or resource.Mapping Options: See Map View setup.
-
Choose Save.
Setting up schedule colors
-
In Schedule, choose the menu icon and then choose Settings.
-
Under Company Options, in the Schedule Configuration section, you can set up custom colors for the background of the work order on the schedule as well as the small square icon within that service call that indicates a property that you define. See [ Setting up custom colors .
-
Status Background Colors: This is the color of the service call as displayed on the schedule and in the unscheduled list.
-
Work Order Icon Colors: The service call icon displays within the service call as displayed on the schedule as well as in the unscheduled list. Choose one of the following properties to indicate what information your dispatchers need to know at a glance. After choosing the property, a list of options displays related to that property.
-
Use Work Order Type
-
Use Work Order Problem
-
Use Division
-
Use Service Area
-
-
-
Choose Save.
Setting up custom colors
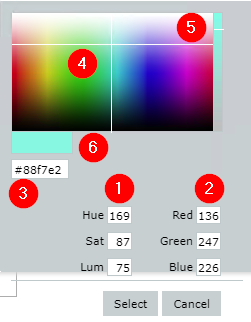
You have several options available to set the color of the service call status or the service call icon. The color picker automatically displays when you choose the field to the right of the label. After the color has been set up for the field, choose Select.

-
HSL - Enter the hue, saturation, and lightness numbers.
-
RGB - Enter the red, green, and blue numbers.
-
HEX - Enter the six character code.
-
Color picker - Use the cross hair to choose a color.
-
Saturation - For any of the above methods, you can darken or lighten the color by using the slide bar on the right side.
-
Color sample - Displays the color that will be used.
In the example below, the following color settings have been set: Default background color (fuchsia), Unscheduled background color (purple), Maintenance Contract icon (green).


Setting up fields to display
In the Service Call & Appointment Form Fields section, you can choose the fields to hide/display when you open the service call, service appointment, job appointment, and/or resource appointment. Each service call or appointment has required fields that cannot be unchecked.
-
In Schedule, choose the menu icon and then choose General Settings.
-
In Company Options under Service Call & Appointment Form Fields, choose to hide/display fields from the following tabs:Service Call FieldsService Appointment FieldsJob Appointment FieldsResource Appointment Fields
-
Choose Save at the bottom of each tabbed window.
