
This is an example of how to process and invoice a service call. When a technician completes the appointment, any time reimbursement entries are automatically submitted.
-
Time and reimbursement entries do not show on the service call until they are approved in the Timesheets window for the employee.
-
Purchase order inventory and non-inventory costs do not show on the service call until they are set to the ERP and the purchase order is received and invoiced in the ERP.
-
Inventory and non-inventory costs added to an appointment show on the Service Call Costs tab.
-
Edit the costs (quantity, billing, etc.) prior to posting.
-
After posting, you can do a return to inventory, however both the original and correcting line will be included on the invoice.
Process the Service Call
Approve Time Entries
Note: Approving time entries is part of the payroll process. This example is to explain that the time entries show up as costs once the entries have been approved in Timesheets.
-
Time
-
Travel
-
Reimbursements
Approve Entries
-
Timesheets > Travel/Time select time entries and click Approve Selected
-
Timesheets > Employee Reimbursements select reimbursements and click Approve Selected
-
When approved, the labor, travel, and reimbursement costs will now show on the service call.
Service Call Costs
These are how the time entry costs display in the Service Call Costs window:
-
Service-Trip (travel time entry)
-
Labor-R (regular time entry)
-
Mileage
Purchase Order Processing
The purchase order needs to be opened and then sent to the ERP. In the ERP, the PO needs to be received and invoiced for the costs to show on the service call in FORGE.
-
In FORGE, go to the service call and click the Purchase Order tab.
-
To the right of the purchase order, click Open PO.
-
Click Send to ERP.
-
In Business Central, go to Purchase Orders.
-
Click the PO and click Post.
-
Select Receive and Invoice and click OK.
-
In FORGE, the purchase order lines are added to the Service Call Costs tab.
-
Non-inventory items show as Posted.
-
Inventory items show as Draft.
-
Send Costs to the ERP
With Direct Posting not enabled, users will need to send the costs to Business Central and then post the transactions in Business Central. With Direct Posting enabled, users post the costs to Business Central.
Using Send to ERP
-
On the Service Call Costs tab of the service call, mark the costs and click Send Selected to ERP.
-
In Business Central, post the lines for the service call. You can filter down to the WS Reference No. to only show that service call.
Using Direct Posting
On the Service Call Costs tab of the service call, mark the costs and click Post.
With Direct Posting only, if you receive an error that the posting data is not within the range of allowed posting dates, your admin will need to go into Business Central > General Ledger Setup and update the allowed date range. Once this is done, you can post the costs.
Review the WS Integration Setup window in Business Central
Review the WS Integration Setup window to determine where to go for posting transactions from FORGE.
Click to view screenshot
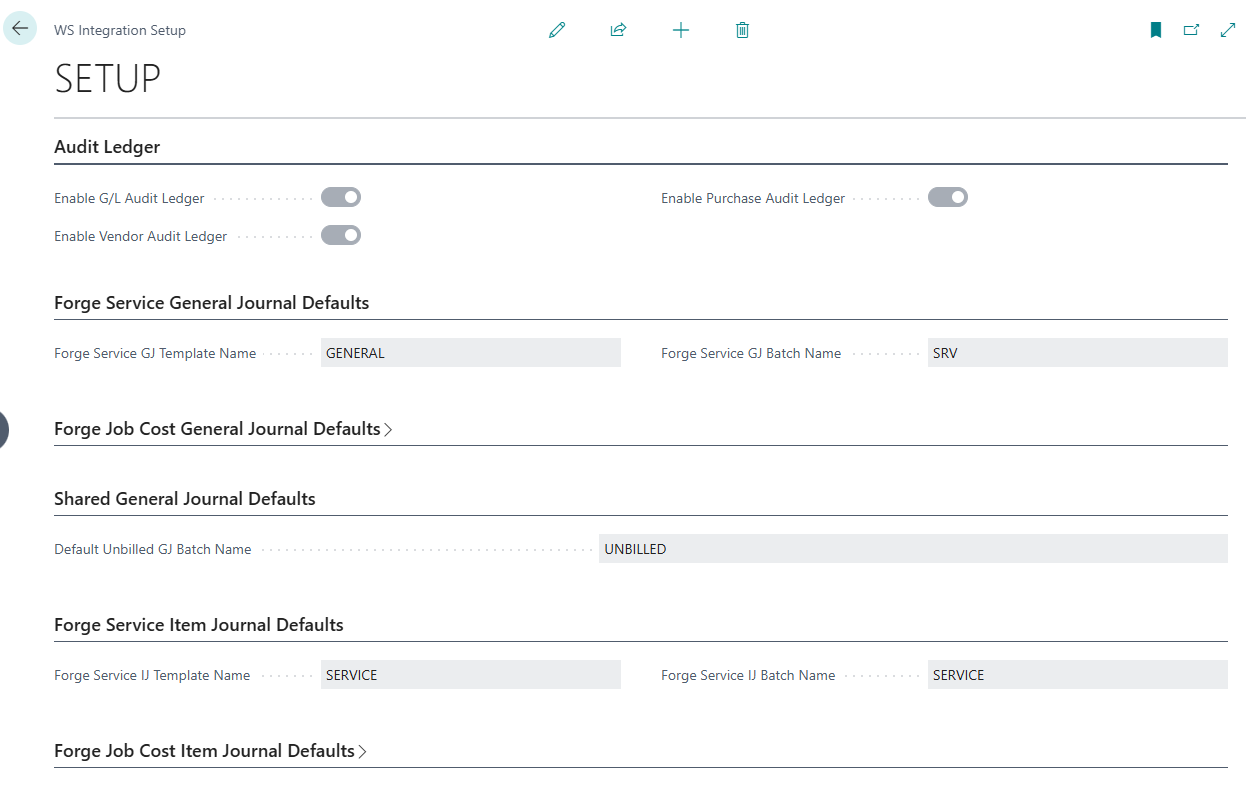
Based on the WS Integration Setup window for the examples below, this is where we will be finding the entries to post in Business Central once the costs are sent to the ERP. Your set up may be different.
General Journal
-
Time
-
Mileage
-
Non Inventory
-
Reimbursements
Item Journal
-
Inventory
-
Purchase Order Inventory (after posting/receiving in Purchase Orders)
Return Inventory
You can items to inventory after you have posted the transaction.
-
In Forge, click the Posted hyperlink for the line item that has quantity to return.
-
Click Return to Inventory.
-
Enter the Quantity and click Return.
-
A new line is added that indicates it is an Inventory Return and has negative numbers for quantity, cost, and billing. The status is set to Sent to ERP.
-
Go to Item Journal > Service > Default batch. The adjustment entry can be viewed.
-
Post the adjustment entry.
Verify That FORGE Costs to Be Invoiced Have a Cost Status of Posted
You can invoice all costs on the call once they have a posted status. Only posted costs can be invoiced. You may create multiple invoices for the service call as your unposted costs become posted.
Processing the Invoice
Create the Invoice
Before creating the invoice, verify that the billing amounts for the costs are correct. You can edit the billing amounts.
-
On the Invoices tab for the service call, click Create Invoice.
-
The posting date defaults to today’s date but you can select a different date.
-
Select the costs to include and click Create.
If you selected only some of the costs, you can create a new invoice for the other costs or add to the existing invoice if the status is still Draft. -
You can print the invoice by clicking the printer icon to the right of the invoice.
-
You can delete the invoice by clicking the trash can icon to the right of the invoice if the invoice has a Draft status.
-
Click the invoice to review the costs and then click Ready to Send. This means that you are ready to send the invoice to the ERP. You can also do this step from the Service Invoices window.
Post the Invoice
-
Go to the Service Invoices window.
-
Select the invoice and click Post Invoices.
-
Select the invoice to see the invoice number created in Business Central.
Review the Invoice in Business Central
This is optional.
-
In Business Central, go to Customers and focus on the customer row.
-
In the Sell-to Customer Sales History section to the right, click Posted Sales Invoices.
-
Select the invoice that was posted.
Correct/Credit the Invoice
IMPORTANT! This will create a credit memo for the entire invoice. You will need to manually add back any costs to the service call.
-
If you need to create a credit memo for the post invoice, in FORGE, go to Service Invoices.
-
Select the invoice and then click Correct/Credit.
-
Enter the posting date and click Queue Correct/Credit.
-
The credit memo is created for the entire invoice.
Send the Invoice by Email to the Customer
Use Send to Customer to email the invoice directly to the customer. This option can only be used once for each invoice. If you need to send the invoice again, save or print the invoice and email it to the customer as an attachment from your email application.
Note: If you create a credit memo and then add the costs to a new invoice, you can use the Send to Customer option for the new invoice.
-
Go to the Service Invoices window.
-
Select the invoice and click Send To Customer.