
Task lists are useful because they group together tasks that are commonly completed together. This eases data entry and allows the technician to have a clear and accurate sense of the assigned duties for a service appointment.
There are many options on how to categorize tasks into task lists. For example, you could create "Basic" and "Deluxe" task lists for different levels of a certain kind of service, such as an oil change. Similarly, you may create lists for certain types of maintenance, such as spring startup routines for air conditioners, that are relevant to much of equipment that is serviced.
Another option is to create a large task list for each specific model of equipment in the system. This list should contain all tasks that might be assigned to that equipment for any kind of service. These task lists can then be edited later to contain only the scheduled tasks needed for the specific contract, quote, or service call.
Task lists can also be set up with a hierarchical structure. Each task list is still comprised of tasks and subtasks, but instead of simply ordering the tasks within a task list, you have the option to hierarchically order them as well as have levels within the tasks.
Task lists can be created in two ways:
-
By creating it from scratch in setup by individually selecting tasks and adding to a list that can then be saved and selected from a lookup in the record.
-
By copying an existing task list from one record to another, then modifying it.
Task lists can be created for service calls, maintenance contracts, and contract quotes. However, once a task list is created, it can be edited and copied to another service call, maintenance contract, or quote.
As with the Task Code Setup window, the Task List Maintenance window can be accessed from the setup menu or directly from any record that has a Task List ID zoom.
Creating a task list type
This field is used to further classify task lists but is currently not functional. Examples: ELECTRICAL, ELEVATOR, EQUIPMENT, HVAC A/C, HVAC HEAT, etc.
-
Choose Microsoft Dynamics GP > Tools > Setup > Service Management > Lookup Setup > Tasks > Task List Type.
-
Enter the task list type.
-
Choose Okay.
Creating a task list in setup
Creating a task list from the setup menus is the most efficient way to create a new list. Lists created here can be accessed and used for Quote task lists, Service Call task lists, and Maintenance Contract task lists.
-
Choose Microsoft Dynamics GP > Tools > Setup > Service Management > Lookup Setup > Tasks > Task Lists. The Task List Maintenance window opens.
-
Enter a new task list ID number and fill out all the fields in the window.
-
Task List ID
Enter a Task List ID. -
Description
Enter a description for the task list. This will vary depending how you have decided to organize your tasks into lists. The task list description may state a type of service, a level of service, an equipment type, or a combination of these classifications based on the purpose of the tasks it contains. -
Protected List
Mark this box if you would like this list to be password-protected. Protected lists cannot be modified when added to a contract, quote, or service call. This would assure that all tasks and subtasks are maintained and completed together. -
Use Hierarchy
Mark this checkbox if you would like to set up your task list in a hierarchical list. See Setting up Task List Hierarchy for more information. -
Task List Type
This field is used to further classify task lists but is currently not functional. -
Frequency
Choose how often this task list should be performed. -
Schedule
Choose when this task list should be scheduled. -
System, Major, Sub 1 - Sub 4
These fields are used when assigning maintenance tasks to pieces of equipment. This information is useful for reference and sorting. For examples of use, see About system, major, sub 1, 2, 3, and 4.Once a list is marked as a Protected List, all setup fields will be disabled and you will be unable to add or remove tasks or subtasks from the list. Be sure to add all tasks and subtasks and complete all setup for the new task list before checking the Protected List box.
When you have entered all the information for your new task list, use the Tasks button to add tasks to the list. The Task List Detail window opens. Use the task code lookup information to search for the task codes you want and Insert them into the list.
To create new tasks for your list, see Setting up Task Codes.
-
Using task code lookup
The task code lookup appears in the Contract Task Maintenance window, the Service Call Task Codes window, Quote Task Maintenance window, and Task List Detail windows.
Once task codes have been created, you can use the Task Code lookup to search for task codes to assign to equipment, records, or task lists. The Task Code lookup offers filters to help locate task codes.
When you have entered search criteria, use the Redisplay button to populate the upper scroll window with tasks limited to your search.
When the upper scroll window populates with task codes based on your search criteria, use the Go button to quickly locate items in the list. To use the Go button, enter a partial entry in the Task Code field and choose the green arrow. The scrolling window will be positioned on the first occurrence of your entry.
If you are viewing a record when you open the Task Maintenance or Task Code lookup window, information from the record, such as equipment ID, will default in the Task Code Lookup window. If you would like to start from a blank window, choose Clear and the information will be removed.
-
System, Major, Sub 1 - Sub 4
These fields are used to filter task code data that is for reference only. Use the Redisplay button after entering filtering data and task codes that meet the criteria will populate the list below. For more information on setting up lookup data for these fields, see Setting up system, major, and sub 1, 2, 3, and 4. -
Task List ID
To select a task from a task list, enter the Task List ID in this field, or select a Task List ID from the lookup. Choose Go, and all items from the selected task list will display in the list below. -
Task Code
Enter a whole or partial task code entry and choose Go. All task codes that contain your search criteria will display in the list below. -
Contract Number
This field shows the contract number for which you are adding tasks to the equipment. It is defaulted by the system. -
Equipment ID
To select an Equipment Record, use the browse buttons around the equipment field or use the lookup to open the Contract Equipment window. You can add tasks to multiple equipment records on one contract. -
Contract Task List ID
Use the Contract Task List ID field to attach tasks to the contract using task lists. Select a Contract Task List ID from the lookup. The tasks from that list will display in the Task Code scroll list at the bottom of the window. -
Description
This field will default in based on the Contract Task List ID that has been selected. -
Task List Type
This field will default in based on the Contract Task List ID that has been selected. -
Start Task based on first available service date
Mark this box if you want the maintenance tasks on a contract to be scheduled on the first available service call date, regardless of the task's assigned schedule. -
Show Subtasks
Mark this checkbox to view subtasks associated with the displayed tasks. Subtasks will appear indented under their task code in the scrolling windows.
-
Add tasks and subtasks by selecting a record in the upper scrolling window and choosing Insert >>. Once tasks appear in the lower scrolling window, they are automatically saved. If you insert a task code with subtasks, all the subtasks insert with it. If you insert a subtask, the parent code is inserted as well. You can insert subtasks more than once. You can edit a task and its subtasks on the fly by selecting a task code in the list and zooming in on it. This will open the Task Code Setup window. Use the arrow buttons to move tasks and subtasks in the upper scrolling window. You can also control the insertion point of a task or sub task by selecting a task in the bottom window. The task code is inserted after the selected item. If nothing is selected on the bottom, the task code is inserted at the bottom of the list.
-
Use the Task Code field that appears between the scrolling windows to quickly add or remove task codes associated with a piece of equipment without using the lookup.
-
When you have finished adding tasks, subtasks, materials, or task lists to the equipment, Save the Maintenance Tasks window and close it.
Other task list maintenance windows
The Contract Quote, Maintenance Contract, and Service Call windows each allow you to create task lists on the fly. These task lists are created in the quote, contract, or service call but can be accessed later and copied for use in another quote, contract, or service call.
These specific Task List Maintenance windows function the same way as the Task List Maintenance window under Setup. However, they allow you to create new lists more conveniently and to make changes to a list that you wish to be unique to the service call, quote, or maintenance contract.
The following instructions will guide you to these windows.
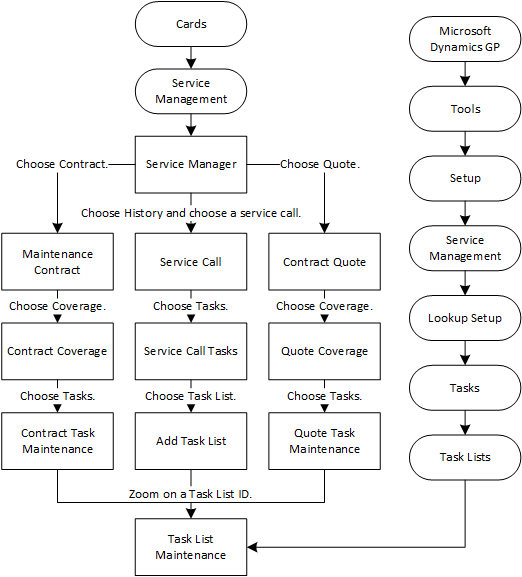
Opening Quote Task List Maintenance window
You must own the Maintenance Contract Quote Module to complete the following steps.
-
Choose Cards > Service Management > Service Manager.
-
Select a customer that has a contract quote and choose the Quote indicator.
-
Choose Coverage.
-
Choose Tasks.
-
Select an equipment record and zoom on the Quote Task List ID field. The Quote Task List Maintenance window opens.For more information on the Quoted Tasks window, see Edit tasks and subtasks attached to the quote in the Maintenance Contract Quote Module chapter.
-
When a task list is entered in the Quote Task Maintenance window Quote Task List ID field, only the tasks and subtasks making up the list display in the right scrolling window. Stand-alone tasks appear in the right scrolling window when the Quote Task List ID field is blank.
-
When you create a quote task list, it is assigned to the maintenance contract quote. It cannot be used anywhere else.
Opening the Maintenance Contract Task List Maintenance window
-
Choose Cards > Service Management > Service Manager.
-
Select a customer and choose the Contract indicator.
-
Choose the Coverage button.
-
Choose the Tasks button.
-
Zoom on Contract Task List ID field. The Contract Task List Maintenance window opens.
When a task list is entered in the Contract Task Maintenance window Contract Task List ID field, only the tasks and subtasks making up the list display in the right scrolling window. Stand-alone tasks appear in the right scrolling window when the Contract Task List ID field is blank.
If there are tasks assigned to your equipment records that you didn't assign per the procedure above, the tasks may have been assigned with the equipment type record, which is part of your equipment record. If the equipment type had a task list assigned, those tasks appear with the equipment record. See Setting Up Equipment Types.
Opening Service Call Task List Maintenance window
You can add task lists to a service call from the Service Call Tasks window using the Task List button. All tasks and subtasks that are part of the task list are added to the service call. Once a task list is added to a service call, it can be edited and reused on other service calls, maintenance contracts, or maintenance contract quotes.
-
Choose Cards > Service Management > Service Manager.
-
Select a customer and choose the History indicator.
-
Double-click a call and choose Tasks.
-
Choose Task List.
-
Use the lookup to select a Task List ID. Zoom on the Task List ID and the Task List Maintenance window will open.
Unlike Maintenance Contracts, a service call may not automatically have equipment assigned to it. You can add task lists to equipment for the service call in the Add Task List window.
-
If you want to assign the task list to a piece of equipment and sublocation, complete the Equipment ID and Sublocation ID fields.
-
Choose Save.
-
The total hours of all tasks entered display in the Total Task Hours field at the bottom of the Service Call Tasks window. Choose Save to schedule the service call. After saving the service call, the estimated hours for the appointment will calculate per the total task hours for all equipment and will display in the Total Appointment Hours field. Total task hours and appointment hours should be equal.
-
If tasks are added to the service call after it has been saved, the appointment hours will not readjust to match the total task hours because the appointment has already been scheduled.
-
If the skill level of the task doesn't match the skill level of the technician assigned to the call, you receive a message. If you password-protected this function, you must enter a password to allow the technician ID to be entered.
Using the Copy Task List window
Using the Copy Task List window, you can create a new task list by copying an existing one. You can use task lists, contract task lists, service call task lists, or quote task lists to create any other type of task lists.
You can use the Copy Task List utility at Microsoft Dynamics GP > Tools > Utilities > Service Manager > Copy Task List to copy task lists from any one record to another.
When it is more convenient, you can also copy the task list over directly from the record.
Opening the Copy Task List window from a service call
-
Choose Cards > Service Management > Service Manager.
-
Select a customer and choose the History indicator.
-
Double-click a call and choose Tasks.
-
Choose Copy Task List. The Copy Task List window opens.
Opening the Copy Task List window from a quote
You must own the Maintenance Contract Quote module to complete the following steps.
-
Choose Cards > Service Management > Service Manager.
-
Select a customer that has a contract quote and choose the Quote indicator.
-
Choose Coverage.
-
Choose Task List. The Copy Task List window opens.
Opening the Copy Task List window from a contract
-
Choose Cards > Service Management > Service Manager.
-
Select a customer and choose the Contract indicator.
-
Choose the Coverage button.
-
Choose the Task Lists button to open the Copy Task List window.
Copying a task list
Any task list can be copied over to create a new task list for a service call, quote, or maintenance contract.
-
In the Copy Task List window, complete the following fields, as necessary.
-
Source
Choose Task List ID, Contract Task List ID, Service Call Task List ID, or Quote Task List ID for the source task list. -
Customer ID, Location ID, Contract Number / Service Call ID / Quote Number, Equipment ID:
The Location ID and Equipment ID default from the records you choose.
-
If the source is a contract task list, choose a Customer ID and Contract Number.
-
If the source is a service call task list, choose a Service Call ID. It is not necessary to choose a Customer ID first unless you want to filter the service calls in the lookup data.
-
If the source is a quote task list, choose a Customer ID and Quote Number.
-
-
-
Choose Copy.