Job data is imported using the following process:
Step 1: Complete the Job Import worksheet using the guidelines below
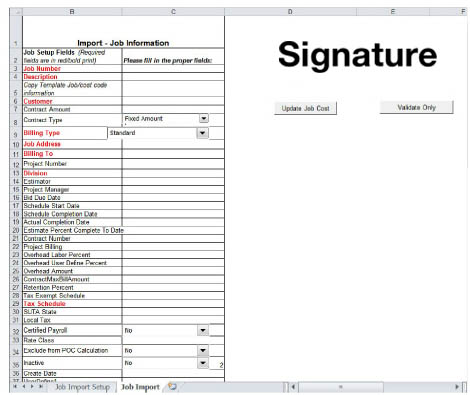
There are three main sections on the Job Import worksheet: Job Information, Cost Codes & Estimates, and Bill Code Numbers.
Most of the fields in each section are self-explanatory, as they correspond to fields in Job Cost. When you enter data into the cells, remember the field requirements and restrictions in Job Cost. These same rules apply to imported data.
For example, the Job Number field in Job Cost is limited to seventeen characters; therefore, if you are creating a new job in the custom spreadsheet, the Job Number must be seventeen characters or less. If you exceed the number of characters, Job Cost will not be updated with the new job. Be sure to check the information that you import for accuracy.
Unused fields
The following fields are not used with this release of Job Import:
-
Project Billing,
-
ContractMaxBillAmount
-
Exclude from POC Calculation
Required fields
Required fields are marked clearly in red. If you attempt to validate or update Job Cost with any required fields blank, those fields are marked with an error in the JobImportResults.html import log file.
The remaining (non-required) fields can be completed as necessary, either in the worksheet or in Job Cost after the data has been imported.
Date fields
Dates must be entered into date fields using the following format only:
YYYY-MM-DDFor example, 2015-05-22
The year must be four digits; the month, two digits; and the day, two digits (with single digit months and days padded with a "0"). The year, month, and day must each be separated with a dash, and the order cannot be switched.
About specific fields
-
Cost Code Number field
The cost code you enter must exist as a master cost code in Job Cost and match the cost code format set up in Job Cost. -
Cost Element field
You must enter the number that represents the cost element (for example "1" for Labor); you cannot enter the description (for example, just "Labor"). -
Division
You can only change divisions for a job if you are NOT using the Percentage-of-Completion posting option in Job Cost and you ARE using the "Change division after costs are posted to a job" setup option. You cannot change the division for a job if any of the following exist for the job: 1) unposted costs, 2) unposted invoices, 3) committed costs. -
Bid Due Date and Create Date fields
These fields are informational only and do not appear on any Job Cost windows; they are stored in the tables for quick retrieval. -
Estimate Amount
This field (in the Import - Cost Codes & Estimates section) is automatically calculated based on the Estimate Amount/Unit and Estimate Units columns. DO NOT delete the Estimate Amount cells. If you have to clear and start over, clear ONLY the Estimate Amount/Unit and Estimate Units fields.
Creating estimates to import
When you use the Job Import worksheet to import cost codes and estimates into Job Cost, those estimates are handled differently depending on whether the Estimate Cost by Period option is turned on in Posting Options. The system date determines what period the transactions are assigned to.
EXAMPLE
The following estimate is entered on 5/08/15:
|
Cost Code Number |
1-10-3 |
|
Cost Element |
1 (Labor) |
|
Estimate Amount / Unit |
$100.00 |
|
Estimate Units |
10 |
|
Estimate Amount |
$1,000.00 |
On 5/10/15, you realize that the estimate needs to be updated, and you enter the following:
|
Cost Code Number |
1-10-3 |
|
Cost Element |
1 (Labor) |
|
Estimate Amount / Unit |
$100.00 |
|
Estimate Units |
20 |
|
Estimate Amount |
$2,000.00 |
-
If the Estimate Cost by Period option is ON, the system accumulates estimates from the multiple estimate entries. In this example, the total estimate for the cost code is 30 units at $3,000. If you were to create an additional estimate for the month of June on 6/08/15, for 5 units at $500, the total estimate for the cost code would be 35 units at $3,500.
-
If the Estimate Cost by Period option is OFF, the system replaces the first estimate with the second estimate. In this example, the new estimate for the cost code is 20 units at $2,000.
Step 2: Validate the information entered on the worksheet
When you finish entering information on the Job Import worksheet, the data should be validated before you actually update Job Cost. This allows you to see whether the update is going to be successful based on the requirements of the Job Cost system. If, for example, you have entered an invalid cost code, validating the information catches and allows you to correct that error.
To validate your data without updating Job Cost, choose Validate Only. When the validation is complete, the Job Cost Import Log appears, displaying any errors that were encountered during validation. Refer to Using the Job Import Worksheet | UsingtheJobImportWorksheet jobcostimportlogfile below for more information.
If everything is validated successfully, the following message appears:
The import data has been validated.
If the import was not successful, you receive a message with the number of errors found during the validation.
The Job Cost Import Log is also saved in the Job Import installation folder as JobImportResults.html if you need to view it again later.
Step 3: Update Job Cost with the changes from the worksheet.
When you have completed and successfully validated the Job Import worksheet, you are ready to import the information into Job Cost. After the import, the corresponding Job Cost records are updated and/or created.
-
On the Job Import Setup worksheet, make sure the Allow to create job option is set appropriately. If you are creating a new job that does not currently exist in Job Cost, this must be marked YES.
-
Double-check your estimates, then choose Update Job Cost.
-
When the import is complete, the Job Cost Import Log appears.
-
If everything is imported successfully, the following message appears: The import data has been validated.
-
If the import was not successful, you receive a message with the number of errors found during the update.
-
The Job Cost Import Log is also saved in the Job Import installation folder as JobImportResults.html if you need to view it again later. See Using the Job Import Worksheet | UsingtheJobImportWorksheet jobcostimportlogfile below.
If you add project tasks after the initial update to Job Cost, you have to manually add the cost codes in Job Cost. The import does not create new cost codes in Job Cost; it only updates data for existing cost codes.
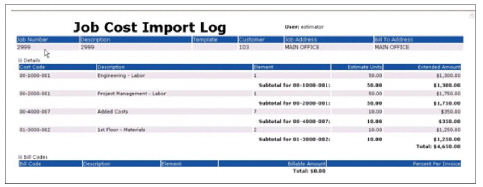
Viewing the Job Cost Import Log file
The Job Cost Import Log summarizes all the cost code information that was successfully and unsuccessfully imported into Job Cost, including cost code subtotal amounts. This detailed information is useful when there are multiple worksheet entries for the same cost code.