With Signature 2018 R4, the Job Close window has been updated and enhanced. The original Dexterity Job Close window has been replaced with a new .Net Job Close window. The new window opens from the existing Routines > Job Close > Close Jobs menu. Users now have the ability to filter jobs for immediate closing or saved into a schedule table for processing later. New SSRS reports include Available to Close, Not Available to Close, and Closed Jobs. The existing Job Preparation Closing report is still available. These new security tasks have been added to the Job Cost Power User Role for the new Close Jobs window: K2AADD_JOBCLOSE (Job Close) and K2AADD_JOBCLOSESET.
For Signature 2018 R4, you can still access the legacy Job Close window by adding a shortcut to the Microsoft Dynamics GP left navigation bar. This window will be deprecated in the next major release. IMPORTANT: We recommend that you
To add the legacy Job Close window shortcut:
-
Launch Microsoft Dynamics GP.
-
On the shortcut sidebar, located at the lower left-hand corner of the window, right-click and select Add > Add Window.
-
In the Add Window Shortcut window, from the list of available windows, select WennSoft Products > 3rd Party.
-
Select Close Jobs. You can rename the shortcut by editing the Name field.
-
Choose Add to create a shortcut to the window on the sidebar.
-
Choose Done.
Table of Contents
/*<![CDATA[*/ div.rbtoc1770847739541 {padding: 0px;} div.rbtoc1770847739541 ul {list-style: disc;margin-left: 0px;} div.rbtoc1770847739541 li {margin-left: 0px;padding-left: 0px;} /*]]>*/ New Security Tasks New Close Jobs Posting Option New Additional Job Close Setup window New Close Jobs Window Overview Evaluation Criteria Available to Close section Not Available to Close section Example of the Close Job window Buttons on this window New SSRS Reports Actions When Closing a Job
New Security Tasks
These new security tasks have been added to the Job Cost Power User Role (WSJC POWERUSER) for the new Close Jobs window:
-
K2AADD_JOBCLOSE (Job Close)
-
K2AADD_JOBCLOSESET - This provides access to the new additional Job Close Setup window.
New Close Jobs Posting Option
A new setup posting option has been added to the Job Cost Posting Options window. Setup > Job Cost > Job Cost Setup > Posting Options.
Allow Job to Close if Total Invoiced not equal to Cash Received
Mark this checkbox if you want the ability to close a job when the total invoiced amount does not equal the cashed received.
New Additional Job Close Setup window
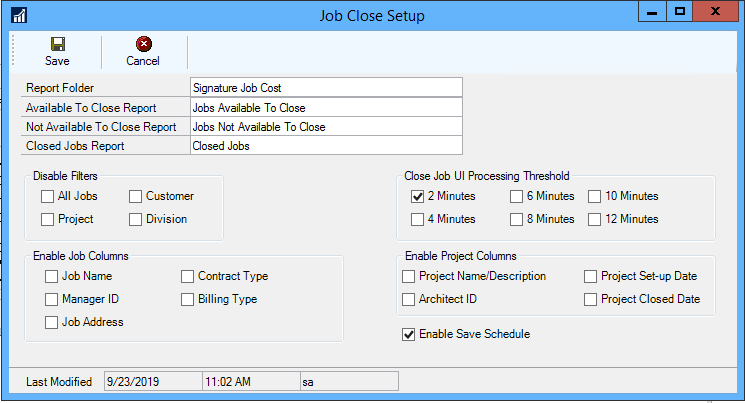
Use the Additional Job Close Setup window to disable filters, indicate the columns that display related to jobs and projects, and to enable users to save a job close schedule. Go to Microsoft Dynamics GP > Tools > Setup > Job Cost > Job Cost Setup > Posting Options. In the Posting Options window, select Additional and then choose Job Close Setup. This menu feature is only available for users who fall under the security task K2ADD_JOBCLOSESET.


-
The Report Folder and Reports fields default to display folder and report names. You only need to edit these fields if you have a custom report that may or may not reside in a different folder. See New SSRS Reports for more information about the reports listed here.
-
In the Disable Filters section
Mark the filters that you do not want to show in the Close Jobs window. All four options display unless marked to disable. Note that you are required to have at least one filter displayed in the Close Job window.
-
-
All Jobs
-
Project
-
Customer
-
Division
-
-
In the Enable Job Columns section
Mark any additional job-related columns to display in the Available Jobs scrolling window. These default to none marked.Job NameManager IDJob AddressContract TypeBilling Type -
Enable Project Columns section
Mark any additional project-related columns to display in the Available Jobs scrolling window. These default to none marked.Project Name/DescriptionArchitect IDProject Set-up DateProject Closed Date -
Close Job UI Processing Threshold section
Mark the number of minutes the job close SQL process may need. The default value is 2 minutes. We recommend that you only change this value if the process times out. -
Enable Save Schedule
Mark to display the Save Schedule button in the Job Close window. This defaults to not marked. Saving a job close schedule allows users to save the entire list of jobs for the User ID and Posting Date for processing later. Any jobs that were marked prior to saving will still be marked when the saved schedule is opened again.Only one schedule per user can be saved at one time.
New Close Jobs Window Overview
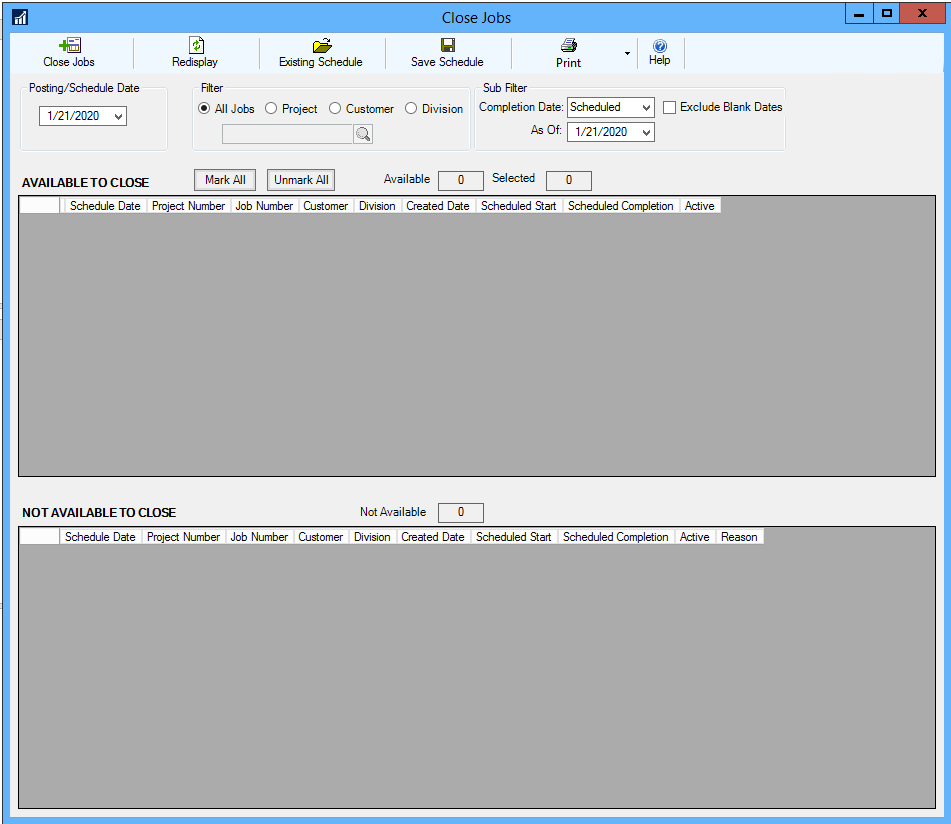
The window opens in an empty state waiting for user input. No jobs are displayed until you enter filter criteria and/or select Redisplay.
With the new Job Close window, you can post TO the GL but not through the GL.

Evaluation Criteria
The evaluation criteria is determined by the filters defined in the Job Close window and the Job Close options selecting in the Posting Options window as well as other criteria defined by a WennSoft stored procedure. (For example, open appointments for the job, unposted costs for the job, etc.) You can update the stored procedure to include any other criteria that you choose. We recommend making a backup of this stored procedure as it may be overwritten by future Job Cost releases.
Posting/Schedule Date: This is the posting date to be used when the job closing batch is created. This date defaults to today and will also default into the "as of" date in sub filters. This is the system date, not the Dynamics GP user interface date.
Filter: This is a radio button - you can only select ONE option.
-
All Jobs - Displays all jobs that are available to be closed.
-
Project - Displays the jobs assigned to the project that you select.
-
Customer - Displays the jobs for the customer you select.
-
Division - Displays the jobs within the division that you select.

Subfilter: These are secondary filters applied in addition to the initial filter criteria.
-
Completion Date: You must pick which "scheduled" date we are evaluating to find jobs ready to close. These are fields on the job master:Scheduled Completion DateActual Completion Date
-
As of (date): This is the date that is used to compare the "Scheduled" or "Actual" completion date of the job master, for inclusion in the Job Close process. As in "include all jobs where Actual Completion Date is equal to or less than <date>".
-
Exclude Blank Dates: Check the box to exclude jobs where the (scheduled or actual) completion date is empty. Given '1/1/1900' is always before the 'as of' date, jobs with no planned completion date would be always be included in the criteria unless we offer an option to exclude them.

Available to Close section
This section of the window displays jobs that successfully pass the job close evaluation criteria as defined in the filters above as well as the Posting Options selections. The jobs are listed by job number and project number order. Each job is listed only once.

-
Mark All/Unmark All: Use these buttons to select or deselect Jobs. Selected jobs are available for Close processing.
-
Available/Selected: These are the display-only record counts for each state shown in the Available to Close section.
Not Available to Close section
This section of the window will display all jobs that failed to pass the job close evaluation criteria. The jobs are listed by job number and project number order. A job will be listed once for each failed evaluation and the reason is noted.

-
Not Available: This is the display-only record count for the jobs listed in the Not Available to Close section.
Example of the Close Job window
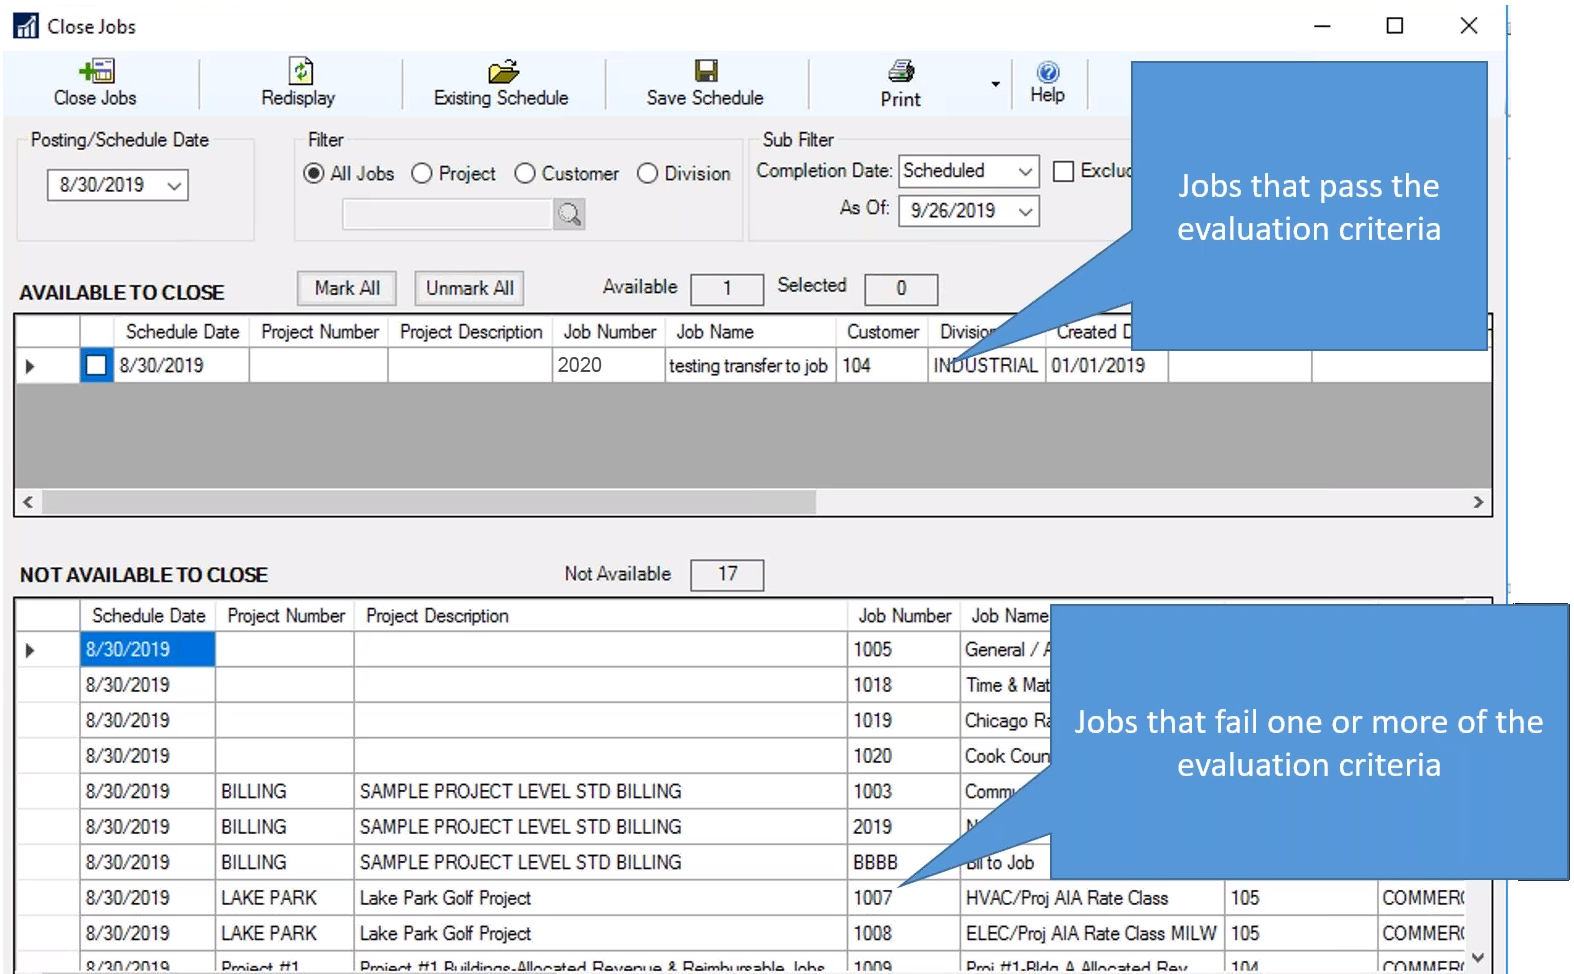
This screenshot shows one job that passed the evaluation criteria and jobs that failed one or more of the evaluation criteria.
In the Available to Close section, the Available display-only field displays that there is 1 job available to close. The Selected field displays 0 because the job is currently not selected to be closed. If you mark the checkbox on the job row, the Selected field would display 1.
In the Not Available to Close section, Not Available displays 17 as there are seventeen jobs that did not pass the evaluation criteria. The job will display for each criteria that it failed. So for example, if a job failed 3 criteria, you will see the job listed three times. A comment field (not shown in this screenshot) to the right of each failed job listing displays the failed criteria.

Buttons on this window

-
Close Jobs: Select to immediately initiate the job close process for all Selected Jobs displayed in the Available to Close section.
-
Redisplay: Select to redisplay after setting the filter criteria. The Redisplay button will also clear a saved schedule.
-
Existing Schedule: Select to load a saved schedule. This button displays if you've turned on the option to save schedules in the Additional Job Close setup window.
-
Save Schedule: Select to save the current schedule. Users can only have one saved schedule. This button displays if you've turned on the option to save schedules in the Additional Job Close setup window. Electing to save a schedule sets aside all of the displayed jobs that meet your filter criteria (our available to close and not available to close) so that you can exit the window then return back to this point, at a future date/time. While you have these jobs displayed in this window or while they are in a saved Schedule, they are inactive for posting purposes, so you should use caution when saving a schedule.
-
Print: Select to display a list of the SSRS reports. Select the report to print. See New SSRS Reports for a description of each report.
New SSRS Reports
New SSRS reports include:
-
Jobs Available to Close: Prints a listing of jobs available to close based on the Posting Date and any filter criteria. This report lists the create date, manager, contract amount, actual cost, markup percent, billed amount, cash received, and contract earned amounts for all jobs you can close. This report is printed from the new Job Close window.

-
Jobs Not Available to Close: Prints a listing of jobs available to close based on the Posting Date and any filter criteria. The job will display for each criteria that it failed.This report is printed from the new Job Close window.

-
Closed Jobs: Prints a listing of jobs that were closed based on the Posting Date and any filter criteria. The data is retrieved from the Job Cost Close Audit (JC1040) and Job History (JC30001) tables. This report is printed from the new Job Close window.

-
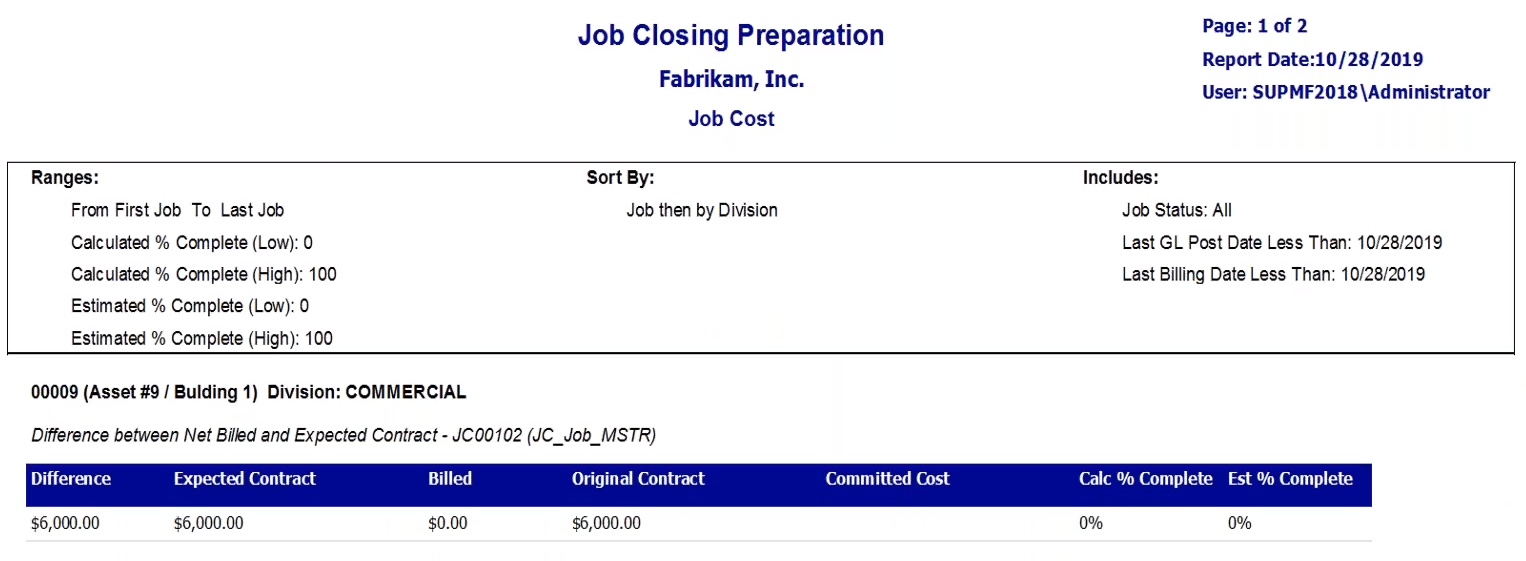
Job Closed Preparation (existing report):

Actions When Closing a Job
-
After you select the Close Jobs button, this immediately initiates the job close process for all Selected Jobs displayed in the Available to Close grid.
-
The Financial GL batch is created (or appended) but only when transactions are necessary.
IMPORTANT: With the new Job Close window, you can post to the GL but not through the GL.
The Job Cost Setup window, in the Close Jobs section, still has the Post Through GL option, however this option only pertains to the legacy window. Regardless of having Post through the GL marked/unmarked, the New Job Close window only lets you post to the GL.
-
Batches are named: "JCC YYYY.MM.DD" where YYYY.MM.DD is the Schedule Close Date.
-
The Jobs Not Available to Close section remains unchanged and these jobs are still "inactive" until the user clears the window.
-
The Financial Batch is generated when posting has occurred on a job. This batch will contain the final WIP → COGSs entry.
-
Source document = "JCC"
